10 Minute Chicken Gravy Recipe: 5 Joyful Ways to Elevate Your Meals

Introduction

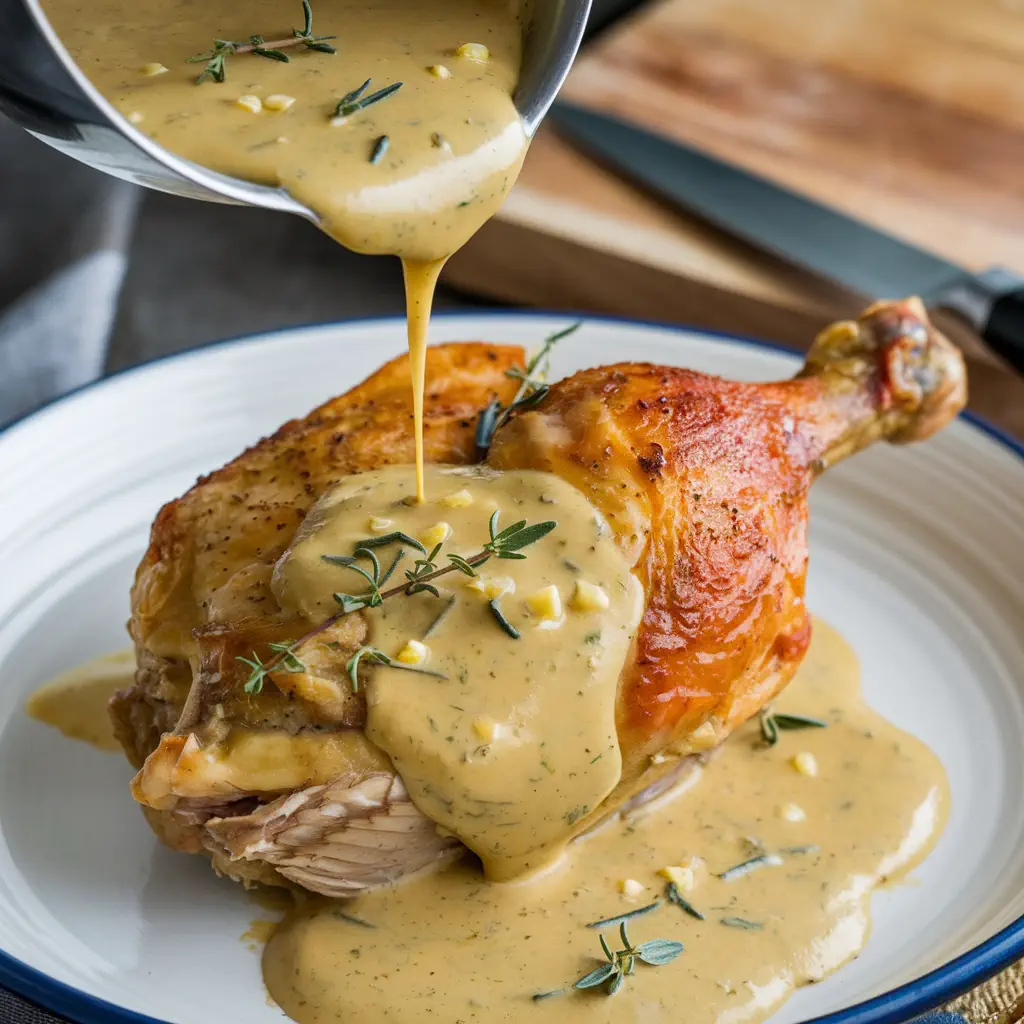
Imagine this : A fork-tender piece of chicken, smothered in a rich, velvety gravy so luxurious it makes your taste buds dance with joy. The kind of gravy that turns a simple meal into a comfort food symphony, bringing families together and creating memories with every savory spoonful. If you’ve ever wondered how to create the most incredible chicken gravy that will have everyone asking for seconds, you’re in exactly the right place. This comprehensive guide will take you from gravy novice to sauce master, unlocking the secrets professional chefs have guarded for generations.

Why Chicken Gravy is More Than Just a Sauce

Chicken gravy isn’t just a condiment – it’s a culinary art form that can elevate even the most modest of meals from mundane to magnificent. Whether you’re preparing a Sunday roast, a weeknight dinner, or looking to impress your in-laws, mastering the perfect chicken gravy is a skill that will serve you for a lifetime.

In many ways, gravy is the unsung hero of the dining table. It bridges flavors, adds moisture, and creates a harmonious connection between proteins and sides. A well-crafted chicken gravy doesn’t just complement your meal – it completes it.

The Rich History of Gravy in Global Cuisines

Before we dive into the practical aspects of gravy-making, let’s appreciate its storied history. Gravy has existed in various forms across cultures for centuries. The French call it “sauce,” the Italians have their “sugo,” and British and American traditions have elevated gravy to an art form.

In medieval European cooking, gravies were often thickened with bread instead of flour. Native American cooking traditions incorporated corn as a thickening agent long before European contact. Understanding these historical contexts helps us appreciate the evolution of the simple yet profound chicken gravy we know today.

The Science Behind Perfect Gravy

Creating the ultimate chicken gravy is a delicate balance of technique, ingredients, and timing. It’s about understanding how flour, fat, and liquid come together to create a smooth, flavorful sauce that clings perfectly to your chicken and side dishes.

At its most fundamental level, gravy is an emulsion – a mixture of two liquids that wouldn’t normally combine. The science involves starches (usually flour) that gelatinize when heated with liquid, causing the mixture to thicken. Meanwhile, the fat component carries flavor compounds that would otherwise remain insoluble in water-based liquids.

Ingredients: The Foundation of Phenomenal Chicken Gravy

Essential Ingredients

  • 4 tablespoons chicken drippings or butter
  • 4 tablespoons all-purpose flour
  • 2 cups chicken stock (preferably homemade)
  • 1/2 teaspoon salt (adjust to taste)
  • 1/4 teaspoon freshly ground black pepper
  • Optional: 1 teaspoon fresh thyme leaves, finely chopped
  • Optional: 1 small clove garlic, minced
  • Optional: 1 tablespoon heavy cream

Pro Tip Ingredient Selection

Choosing high-quality ingredients is the first step to extraordinary gravy. Free-range chicken stock, freshly ground black pepper, and real butter can make a world of difference in your final product.

The Truth About Butter vs. Drippings

While butter makes an excellent substitute when drippings aren’t available, nothing compares to the complex flavor of fresh chicken drippings. These drippings contain concentrated chicken essence, caramelized bits (fond), and rendered fat that simply cannot be replicated.

If using butter, consider adding a teaspoon of Better Than Bouillon chicken base or a quarter teaspoon of poultry seasoning to approximate the depth of flavor in drippings.

Chicken Stock: Store-Bought vs. Homemade

Homemade stock will always yield superior results, but high-quality store-bought stocks can still produce excellent gravy. Look for low-sodium options to control salt levels in your final product. Brands like Kitchen Basics and Pacific Foods offer respectable alternatives to homemade.

If using store-bought stock, consider enhancing it by simmering with a few chicken wing tips, a small carrot, and a piece of celery for 30 minutes, then straining before using in your gravy.

Step-by-Step Guide to Gravy Perfection

Preparing Your Base

1- Collect Drippings: After roasting a chicken, collect those golden-brown drippings from the pan. They’re liquid gold for your gravy.

2- Separate Fat: Allow the drippings to settle in a glass measuring cup. The fat will rise to the top, making it easy to separate.

3- Measure Fat: You’ll need approximately 4 tablespoons of fat. If you don’t have enough from the drippings, supplement with butter.

Creating the Perfect Roux

The roux is the thickening foundation of your gravy, and getting it right is crucial for texture and flavor.

1- Heat the Fat: In a heavy-bottomed saucepan, heat your chicken fat or butter over medium heat until melted and hot.

2- Add Flour Gradually: Sprinkle the flour over the fat while whisking continuously to prevent lumps.

3- Cook the Roux: Continue whisking for 3-5 minutes. This cooking process is essential for two reasons:

  • It eliminates the raw flour taste
  • It determines the color and flavor depth of your final gravy

Roux Color Guide:

  • Blonde Roux (2-3 minutes): Lighter color and flavor, suitable for cream-based chicken gravies
  • Medium Roux (4-5 minutes): Golden brown, nutty flavor, ideal for traditional chicken gravy
  • Dark Roux (6-8 minutes): Deep brown, more robust flavor, better suited for beef gravies but can work with chicken for a more intense flavor profile

Technique Matters

The secret to smooth gravy lies in your technique. Whisk continuously, add liquid gradually, and never rush the process. Patience is the invisible ingredient that transforms good gravy into great gravy.

1- Add Stock Gradually: Pour in your chicken stock slowly, about 1/4 cup at a time, whisking vigorously between additions to maintain smoothness.

2- Maintain Temperature: Keep your heat at medium to medium-low. Too high, and the gravy might break; too low, and it won’t thicken properly.

3- Simmer Gently: Once all stock is incorporated, allow the gravy to simmer gently for 5-10 minutes, stirring occasionally. This develops flavor and achieves the perfect consistency.

Seasoning Your Masterpiece

Seasoning should be done toward the end of the cooking process, as reduction will concentrate flavors.

1- Taste First: Always taste before adding salt, especially if your stock or drippings were seasoned.

2- Add Herbs: If using fresh herbs like thyme or rosemary, add them in the last 2-3 minutes of cooking.

3- Final Adjustments: A splash of cream, a dash of soy sauce, or a few drops of lemon juice can all be secret weapons for balancing and enhancing flavor.

Common Chicken Gravy Challenges and Solutions

Problem 1: Lumpy Gravy

Challenge: Flour clumps that make your gravy look more like wet cement than a silky sauce.

Solution:

  • Sift flour before adding to the fat
  • Whisk vigorously during incorporation
  • Use a fine-mesh strainer if lumps form
  • Consider using a hand blender (immersion blender) to smooth out stubborn lumps
  • Mix flour with cold water to create a slurry before adding to hot liquid

*Prevention Tip : Always add flour to fat, not liquid to flour, and incorporate gradually while whisking constantly.

Problem 2: Bland Flavor

Challenge: Gravy that tastes flat and uninspired.

Solution:

  • Use homemade or high-quality stock
  • Add depth with herbs and seasonings (thyme, sage, garlic powder)
  • Consider a splash of white wine (reduced before adding other liquids)
  • Incorporate pan drippings for extra flavor
  • Add umami with a small amount of soy sauce, Worcestershire sauce, or nutritional yeast
  • Roast chicken bones and vegetables before making stock
  • Use a splash of sherry vinegar or lemon juice to brighten flavors

* Chef’s Secret: A pinch of MSG (monosodium glutamate) can dramatically enhance savory flavors without adding an identifiable taste of its own.

Problem 3: Too Thin or Too Thick

Challenge: Gravy consistency that’s more like water or paste.

Solution:

  • For thin gravy: Continue simmering to reduce and concentrate
  • For thin gravy as a quick fix: Create a flour/cornstarch slurry (mixed with cold water) and gradually whisk in
  • For thick gravy: Gradually add more stock, whisking continuously
  • Use cornstarch as an alternative thickener for gluten-free options (1 tablespoon cornstarch mixed with 1 tablespoon cold water per cup of gravy)

* Pro Tip: The ideal gravy should coat the back of a spoon but still flow smoothly when poured.

Problem 4: Greasy or Separated Gravy

Challenge: Gravy with a visible oil slick on top or a broken appearance.

Solution:

  • Skim excess fat from the surface with a spoon
  • Whisk vigorously to re-emulsify
  • Add a small amount of cold stock while whisking
  • For prevention, ensure proper ratio of fat to flour (generally 1:1)
  • Use a fat separator for drippings

* Scientific Tip: A properly made roux creates a stable emulsion that prevents separation if the ratio of fat to flour is balanced.

Problem 5: Skin Formation

Challenge: A skin forms on top of the gravy when it sits.

Solution:

  • Place plastic wrap directly on the surface of the gravy when storing
  • Stir occasionally while the gravy sits in a serving vessel
  • A small pat of butter floated on top prevents skin formation
  • Cover with a lid when not actively serving

Flavor Variations to Elevate Your Gravy Game

Herb-Infused Chicken Gravy

Experiment with fresh herbs like:

  • Thyme: Earthy, subtle flavor that pairs beautifully with chicken
  • Rosemary: Aromatic, pine-like notes (use sparingly)
  • Sage: Traditional poultry herb with a distinctive flavor
  • Parsley: Adds freshness when added at the end of cooking
  • Tarragon: Licorice-like notes that complement chicken beautifully

* Method : Add hardy herbs (thyme, rosemary, sage) during cooking, and delicate herbs (parsley, chives) just before serving.

Creamy Variations

  • Add 2-3 tablespoons of heavy cream for richness
  • Incorporate 1 ounce of cream cheese for extra smoothness
  • Use 1/4 cup half-and-half for a lighter creamy touch
  • Add 2 tablespoons of plain Greek yogurt for tanginess and creaminess

* Technique Tip: When adding dairy products, reduce heat to low and incorporate gradually to prevent curdling.

Mushroom Chicken Gravy

  • Sauté 1/2 cup finely chopped mushrooms in butter before making the roux
  • Use mushroom stock for an earthy twist
  • Add 1 teaspoon of dried porcini powder for intense mushroom flavor
  • Finish with a splash of sherry for elegance

* Gourmet Touch: For special occasions, use wild mushrooms like chanterelles or morels instead of button mushrooms.

Wine-Enhanced Chicken Gravy

  • Reduce 1/4 cup white wine before adding stock
  • Try marsala for a sweet-savory profile
  • Use sherry for nutty depth
  • Add a splash of dry vermouth for herbal notes

* Important Note: Always cook alcohol thoroughly to mellow the flavor and cook off the alcohol content.

Global Flavor Profiles

French Influence: Add a pinch of herbes de Provence and finish with a dot of Dijon mustard

Italian Touch: Incorporate roasted garlic and a pinch of dried oregano

Asian Fusion: Add a small amount of ginger, garlic, and a splash of soy sauce

Southern Comfort: Include a dash of hot sauce and a pinch of cayenne

Mediterranean Style: Finish with lemon zest and a sprinkle of freshly chopped parsley

Nutritional Considerations

While delicious, chicken gravy is typically high in calories and fat. Moderation is key. A typical serving contains:

  • Approximately 50-70 calories per 1/4 cup
  • 4-6 grams of fat
  • 2-3 grams of protein
  • Varying sodium levels (often 300-500mg per serving)

Healthier Alternatives

  • Use olive oil instead of butter for heart-healthy fats
  • Replace some flour with cornstarch for fewer calories
  • Incorporate low-sodium chicken stock to reduce salt
  • Add pureed vegetables (roasted cauliflower, celery root) for thickness and nutrition
  • Skim fat from drippings before using
  • Use unsalted butter to control sodium content
  • Try arrowroot powder as a gluten-free, lower-calorie thickener

* Dietary Adaptation: For keto or low-carb diets, use xanthan gum (1/4 teaspoon per cup of liquid) instead of flour as a thickener.

Make-Ahead and Batch Cooking Tips

Preparing in Advance

Gravy can be made up to 3 days ahead of serving time, making it perfect for reducing stress during big meals.

  1. Cook completely and cool quickly
  2. Store in airtight containers
  3. Reheat gently, whisking occasionally
  4. You may need to add a splash of stock when reheating

Freezing Gravy

Yes, you can freeze gravy! Follow these guidelines:

  • Cool completely before freezing
  • Store in airtight containers, leaving 1/2 inch headspace for expansion
  • Freeze for up to 3 months
  • Thaw overnight in refrigerator
  • Reheat gently, whisking to recombine if separation occurs

* Pro Tip: Freeze gravy in ice cube trays, then transfer the frozen cubes to a freezer bag for convenient small portions.

Storage and Reheating Tips

Refrigeration

  • Store in an airtight container
  • Keeps fresh for 3-4 days
  • Allow to cool completely before storing (within 2 hours of cooking)
  • Place plastic wrap directly on the surface to prevent skin formation

Reheating

  • Gentle reheat on stovetop over medium-low heat
  • Whisk occasionally to maintain smooth texture
  • Add a little stock if too thick (1-2 tablespoons at a time)
  • Microwave at 50% power, stirring every 30 seconds
  • Avoid boiling, which can cause separation

* Food Safety Tip: Gravy should be reheated to 165°F (74°C) for food safety and should only be reheated once.

Cultural and Culinary Significance

Chicken gravy transcends mere cooking – it’s a cultural connector. From Southern American kitchens to British Sunday roasts, gravy represents comfort, tradition, and love served on a plate.

Global Gravy Inspirations

  • American Southern-style cream gravy: Typically made with milk and served with chicken-fried steak or biscuits
  • French “sauce supreme”: A refined chicken velouté finished with cream
  • British roast dinner gravy: Rich, dark, and essential to Sunday tradition
  • German Jagdsoße (hunter’s sauce): Incorporates mushrooms and sometimes sour cream
  • Italian sugo d’arrosto: Often made with wine and served with roasted meats

Equipment Essentials for Perfect Gravy

Must-Have Tools

1- Heavy-bottomed saucepan: Distributes heat evenly to prevent burning

2- Whisk: A balloon whisk works best for incorporating ingredients smoothly

3- Measuring cups and spoons: For precise ingredient ratios

4- Fine-mesh strainer: To ensure silky-smooth results

5- Fat separator: Helps remove excess grease from drippings

6- Gravy boat: Not just decorative – the design keeps gravy warm longer

Nice-to-Have Equipment

  • Immersion blender: Rescues lumpy gravy in seconds
  • Wooden spoon with flat edge: Helps scrape up flavorful fond from roasting pans
  • Silicone spatula: For getting every last drop from the pot

Pairing Your Perfect Gravy

Classic Pairings

  • Roast chicken with mashed potatoes
  • Turkey and stuffing
  • Biscuits for a traditional Southern breakfast
  • Yorkshire pudding for a British-inspired meal

Unexpected Applications

  • Drizzled over roasted vegetables
  • As a base for pot pie filling
  • Tossed with pasta for a simple comfort food dish
  • As a dipping sauce for crusty bread
  • Added to casseroles for moisture and flavor

Final Thoughts: More Than Just a Sauce

Creating the perfect chicken gravy is an art form that combines science, technique, and a dash of love. It’s about transforming simple ingredients into something that brings people together, creates memories, and turns an ordinary meal into an extraordinary experience.

Your Gravy Adventure Begins Now

Don’t just read this recipe – live it, cook it, share it! Imagine the smiles around your dinner table, the compliments flowing as freely as your perfectly crafted gravy. Every great chef started somewhere, and today, that somewhere is right here, right now.

Grab your whisk, channel your inner culinary artist, and let’s make gravy magic happen!

Troubleshooting FAQs

Q: Why does my gravy always get lumpy?

A: Lumps typically form when flour meets hot liquid directly. Always make a roux with fat first, and add liquid gradually while whisking continuously.

Q: Can I make gravy without drippings?

A: Absolutely! Use butter instead of drippings and enhance flavor with good-quality stock, herbs, and perhaps a bit of Better Than Bouillon or other flavor concentrate.

Q: How do I fix gravy that’s too salty?

A: Add unsalted stock, a peeled potato chunk (remove before serving), or a small amount of cream to balance saltiness. Avoid adding water, which dilutes flavor.

Q: Can I make gluten-free chicken gravy?

A: Yes! Use cornstarch, arrowroot, or a gluten-free flour blend instead of wheat flour. Mix with cold water to create a slurry before adding to hot liquid.

Q: Why did my gravy turn out lighter/darker than expected?

A: The color of gravy depends on how long you cook the roux. For darker gravy, cook the flour and fat mixture longer before adding liquid.

Expert Tips from Professional Chefs

  • Chef Tip #1: Save and freeze chicken bones and vegetable scraps to make homemade stock when you have enough.
  • Chef Tip #2: A splash of apple cider vinegar or white wine brightens flavors without making the gravy taste acidic.
  • Chef Tip #3: For special occasions, infuse your stock with aromatic ingredients like whole peppercorns, bay leaves, and parsley stems.
  • Chef Tip #4: When making large batches, divide the process – make roux in one pot and heat stock in another before combining.
  • Chef Tip #5: The best gravy makers taste frequently and adjust as they go, not just at the end.

Sustainability in Gravy Making

Making gravy is inherently sustainable – it uses parts of the chicken (drippings, bones for stock) that might otherwise be discarded. To further your eco-friendly cooking:

  • Use every part of the chicken for minimal waste
  • Make stock from leftover bones and vegetable trimmings
  • Store gravy in reusable glass containers
  • Compost any unused herbs or vegetable scraps
  • Freeze excess gravy rather than discarding it

A Personal Note on Gravy Traditions

Gravy-making is often a skill passed down through generations, with subtle techniques and personal touches that make each family’s version unique. Consider starting a gravy journal to document your experiments and successes, creating your own legacy recipe to pass along.

Bon appétit!

3 Irresistible Chicken Burrito Recipes for a Flavorful Fiesta

Introduction

Have you ever found yourself craving the warm, satisfying embrace of a perfectly wrapped chicken burrito, but felt intimidated by recreating that authentic Mexican restaurant experience at home? You’re not alone. The magic combination of tender, spiced chicken, fluffy rice, creamy beans, and fresh toppings all nestled in a warm tortilla creates a culinary masterpiece that seems complex but is actually within your reach. In this comprehensive guide, we’ll unlock the secrets to crafting the perfect chicken burrito with three foolproof recipes that will transform your home kitchen into your new favorite Mexican restaurant.

Why Chicken Burritos Deserve a Place in Your Recipe Collection

Chicken burritos represent the perfect marriage of convenience, nutrition, and flavor. Originating from the border regions of Northern Mexico and the Southwestern United States, these handheld meals have evolved from simple street food to beloved comfort cuisine worldwide. The versatility of chicken burritos makes them ideal for meal prep, family dinners, or casual entertaining. They can be customized to suit various dietary preferences and taste profiles while maintaining their essential character.
The beauty of chicken burritos lies in their adaptability. Whether you prefer your chicken grilled with a smoky char, slow-cooked until meltingly tender, or quickly sautéed with vibrant spices, there’s a chicken burrito recipe that will satisfy your particular cravings. The complementary ingredients – from rice and beans to salsas and guacamole – create a complete, balanced meal wrapped in a convenient, portable package.

Essential Ingredients for Authentic Chicken Burritos

Before diving into specific recipes, let’s explore the fundamental components that make a chicken burrito truly special. Understanding these building blocks will empower you to create your own variations or adapt our featured recipes to your personal preferences.
The foundation of any great chicken burrito begins with properly prepared chicken. This means well-seasoned, juicy pieces that carry flavor throughout the burrito. Traditional Mexican seasonings like cumin, chili powder, oregano, and garlic form the aromatic base, while lime juice adds brightness and helps tenderize the meat. Quality matters here – opt for boneless, skinless chicken thighs for maximum juiciness, or chicken breasts for a leaner option.
Next comes the supporting cast: rice (preferably seasoned with lime and cilantro), beans (black or pinto, depending on your preference), and cheese (a melty variety like Monterey Jack or queso fresco for authenticity). Fresh elements like diced tomatoes, onions, and cilantro provide brightness and textural contrast. And of course, there are the enhancement options: guacamole, sour cream, various salsas, and hot sauces that allow for personalization.
The vessel that holds this culinary treasure is equally important. Choose large (10-12 inch) flour tortillas that are fresh and pliable. Warming them briefly before assembly ensures they won’t crack during the wrapping process – a crucial step for burrito success.

Chicken Burrito Components: A Schematic Overview

ComponentTraditional OptionsModern AlternativesHealth-Conscious Choices
ProteinSeasoned shredded chicken
Grilled chicken breast
Slow-cooked chicken thighs
Chipotle-lime chicken
Tequila-marinated chicken
Adobo-rubbed chicken
Lean chicken breast
Plant-based chicken
substitute
Half chicken,
half beans
GrainsMexican rice
Spanish rice
Plain white rice
Cilantro-lime rice
Brown rice
Mexican cauliflower rice
Quinoa
Cauliflower rice
Brown rice
BeansRefried pinto beans
Whole black beans
Charro beans
Black bean and corn mix
Spicy beans with chipotle
Beer-simmered beans
Low-sodium beans
Sprouted beans
Lentil substitute
CheeseMonterey Jack
Queso fresco
Cheddar cheese
Pepper Jack
Oaxaca cheese
Mexican cheese blend
Reduced-fat cheese
Plant-based cheese
Light sprinkle of cotija
VegetablesDiced tomatoes
Onions
Lettuce
Roasted corn
Grilled peppers
Pickled red onions
Spinach
Kale slaw
Extra vegetable medley
SaucesPico de gallo
Red salsa
Guacamole
Mango salsa
Avocado-lime crema
Chipotle sauce
Greek yogurt instead of sour cream
Tomatillo salsa
Light guacamole
TortillaLarge flour tortilla
Wheat tortilla
Spinach wrap
Jalapeño-cheddar wrap
Tomato basil wrap
Whole grain wrap
Low-carb wrap
Cassava flour tortilla
Lettuce wrap
Additional ToppingsCilantro
Lime wedges
Jalapeños
Crispy tortilla strips
Fresh pineapple
Cotija cheese
Microgreens
Hemp seeds
Nutritional yeast

Classic Shredded Chicken Burrito Recipe

Our first recipe showcases the traditional approach to chicken burritos, featuring tender shredded chicken that’s been slowly simmered with aromatic spices. This method allows the flavors to penetrate deeply into the chicken, creating a juicy, flavorful filling that forms the heart of an exceptional burrito.

Ingredients (Makes 4 Burritos):

  • 1 pound boneless, skinless chicken thighs
  • 2 tablespoons olive oil
  • 1 onion, finely diced
  • 3 cloves garlic, minced
  • 1 tablespoon ground cumin
  • 2 teaspoons chili powder
  • 1 teaspoon dried oregano
  • 1/2 teaspoon smoked paprika
  • 1/4 teaspoon cayenne pepper (optional, for heat)
  • 1 cup chicken broth
  • 2 tablespoons lime juice
  • Salt and pepper to taste
  • 2 cups cooked Mexican rice
  • 1 (15 oz) can black beans, drained and rinsed
  • 1 cup shredded Monterey Jack cheese
  • 1/2 cup sour cream
  • 1 cup prepared pico de gallo
  • 1 avocado, sliced
  • 1/4 cup chopped fresh cilantro
  • 4 large flour tortillas

Instructions:

1- Heat olive oil in a large skillet over medium heat. Add diced onion and sauté until translucent, about 5 minutes.
2- Add minced garlic and cook for another 30 seconds until fragrant.
3- Add cumin, chili powder, oregano, smoked paprika, and cayenne (if using). Stir to coat the onions and toast the spices for 1 minute.
4- Add chicken thighs, chicken broth, lime juice, salt, and pepper. Bring to a simmer, then reduce heat to low.
5- Cover and cook for 25-30 minutes until chicken is very tender and can be easily shredded.
6- Remove chicken from the liquid and shred using two forks. Return the shredded chicken to the pan and simmer uncovered for another 5-10 minutes until most of the liquid has reduced, creating a moist but not soupy mixture.
7- Warm the tortillas in a dry skillet or microwave for 15-20 seconds to make them pliable.
8- To assemble each burrito, place a tortilla on a flat surface and add about 1/2 cup of Mexican rice in the center, leaving at least 2 inches from the edge.
9- Top with 1/4 of the shredded chicken mixture, followed by beans, cheese, sour cream, pico de gallo, avocado slices, and cilantro.
10- Fold in the sides of the tortilla, then fold up the bottom and roll tightly to enclose the filling. If desired, return the assembled burrito to a hot skillet and toast seam-side down to seal it and create a crispy exterior.

This classic preparation highlights the traditional flavors of Mexican cuisine while creating a satisfying, complete meal. The slow-cooked chicken provides a depth of flavor that serves as the perfect foundation for the fresh, vibrant toppings.

Quick and Easy Grilled Chicken Burrito

Our second recipe offers a faster approach that doesn’t compromise on flavor. By using the high heat of grilling (or a grill pan), we achieve chicken with a delicious char and smoky undertones that add another dimension to your burrito experience.

Ingredients (Makes 4 Burritos):

  • 1 pound boneless, skinless chicken breasts
  • 2 tablespoons olive oil
  • 1 tablespoon lime juice
  • 2 teaspoons chili powder
  • 1 teaspoon ground cumin
  • 1 teaspoon garlic powder
  • 1/2 teaspoon onion powder
  • 1/2 teaspoon dried oregano
  • 1/4 teaspoon cayenne pepper (optional)
  • Salt and pepper to taste
  • 2 cups cooked cilantro-lime rice
  • 1 (15 oz) can pinto beans, warmed
  • 1 cup shredded pepper jack cheese
  • 1 cup guacamole
  • 1/2 cup sour cream
  • 1 cup shredded lettuce
  • 1/2 cup diced tomatoes
  • 1/4 cup diced red onion
  • 4 large flour tortillas
  • Hot sauce to taste

Instructions:

1- In a bowl, combine olive oil, lime juice, chili powder, cumin, garlic powder, onion powder, oregano, cayenne (if using), salt, and pepper to create a marinade.
2- Place chicken breasts between sheets of plastic wrap and pound to an even thickness of about 1/2 inch for even cooking.
3- Coat chicken with the marinade and let sit for at least 15 minutes (or up to 4 hours in the refrigerator for more flavor).
4- Preheat grill or grill pan to medium-high heat. Grill chicken for 5-6 minutes per side until internal temperature reaches 165°F (74°C).
5- Let chicken rest for 5 minutes, then dice into bite-sized pieces.
6- Warm tortillas briefly on the grill or in a microwave.
7- To assemble each burrito, layer cilantro-lime rice, grilled chicken pieces, pinto beans, and cheese in the center of each tortilla.
8- Top with guacamole, sour cream, lettuce, tomatoes, and red onion.
9- Add hot sauce to taste if desired.
10- Fold the sides of the tortilla in, then roll from the bottom up, tucking in the sides as you go to create a tight cylinder.

This recipe is perfect for busy weeknights when you want the satisfaction of a homemade burrito without spending hours in the kitchen. The high-heat cooking method creates caramelization on the chicken that adds complexity to the overall flavor profile.

Slow Cooker Chicken Burrito Bowl

Our third recipe offers a convenient slow cooker method that creates incredibly tender, flavor-infused chicken with minimal hands-on time. This recipe is presented as a burrito bowl but can easily be wrapped in tortillas for a traditional burrito experience.

Ingredients (Makes 4 Servings):

  • 1.5 pounds boneless, skinless chicken thighs
  • 1 (14.5 oz) can diced tomatoes with green chilies
  • 1 cup chicken broth
  • 1 onion, diced
  • 1 bell pepper, diced
  • 2 cloves garlic, minced
  • 1 tablespoon chili powder
  • 2 teaspoons ground cumin
  • 1 teaspoon dried oregano
  • 1 teaspoon smoked paprika
  • 1/2 teaspoon salt
  • 1/4 teaspoon black pepper
  • 1 (15 oz) can black beans, drained and rinsed
  • 1 cup frozen corn kernels
  • 2 cups cooked brown rice
  • For serving: shredded cheese, sour cream, avocado, cilantro, lime wedges, and tortillas (optional)

Instructions:

1- Place chicken thighs in the slow cooker.
2- Add diced tomatoes with chilies, chicken broth, onion, bell pepper, garlic, and all seasonings (chili powder through black pepper).
3- Cover and cook on low for 6-7 hours or on high for 3-4 hours until chicken is very tender.
4- During the last 30 minutes of cooking, add black beans and corn to warm through.
5- Remove chicken from the slow cooker and shred with two forks. Return to the slow cooker and stir to combine with the sauce and vegetables.
6- To serve as burrito bowls, place a portion of brown rice in each bowl and top with the chicken mixture.
7- Add desired toppings: shredded cheese, sour cream, avocado, cilantro, and a squeeze of lime juice.
8- If preferred as traditional burritos, warm large flour tortillas and fill with rice, chicken mixture, and toppings before rolling.

This slow cooker method is ideal for busy days when you want to come home to a ready-made meal. The long, slow cooking process allows the flavors to meld beautifully, creating chicken that’s incredibly tender and infused with the aromatic spices.

Tips for Perfect Burrito Assembly

Achieving the perfect burrito isn’t just about great ingredients – proper assembly technique is crucial for a satisfying eating experience. Follow these professional tips to create restaurant-quality burritos at home:

1- Warm your tortillas properly: A cold tortilla will crack when folded. Warm each tortilla for 15-20 seconds in a dry skillet or microwave between damp paper towels to make it pliable.
2- Create a moisture barrier: Layer ingredients strategically to prevent a soggy tortilla. Place drier ingredients like rice or cheese directly on the tortilla first, then add wetter ingredients like sauces and salsas in the center.
3- Don’t overfill: The temptation to create a giant burrito can lead to structural failure. Limit filling to about 1 cup total per standard large tortilla.
4- Master the fold: Place fillings in a horizontal line across the center of the tortilla, leaving about 2 inches of space on all sides. Fold in the sides first, then fold up the bottom over the filling, tucking it in and under the filling as you roll forward.
5- Secure the seal: For extra security, you can briefly toast the seam-side down in a hot, dry skillet. The heat helps seal the edge and adds a pleasant textural contrast with a slightly crispy exterior.

Customizing Your Chicken Burrito Experience

One of the joys of making burritos at home is the ability to customize them according to your preferences and dietary needs. Here are some creative variations to consider:

  • Heat level adjustments: Modify the spice level by adjusting cayenne pepper or adding jalapeños, serrano peppers, or habaneros for those who enjoy intense heat.
  • Dietary adaptations: For low-carb options, use lettuce wraps instead of tortillas or create a bowl version. For gluten-free diets, seek out certified gluten-free tortillas or corn tortillas (though they’re smaller and more challenging to roll).
  • Global fusion: Incorporate international flavors by adding ingredients like Thai sweet chili sauce, Korean gochujang, or Indian curry spices to your chicken marinade.
  • Creative fillings: Experiment with unexpected additions like roasted sweet potatoes, pickled red onions, mango salsa, or even crispy bacon bits for unique flavor combinations.

Make-Ahead and Storage Strategies

Chicken burritos are excellent candidates for meal prepping and batch cooking. Here’s how to maximize convenience without sacrificing quality:
For make-ahead burritos, prepare all components but keep them separate until ready to assemble. Cooked chicken can be refrigerated for up to 3 days or frozen for up to 3 months. Rice and beans also freeze well in separate containers.
If assembling burritos for future meals, wrap each completed burrito tightly in aluminum foil before placing in a freezer-safe bag. Frozen burritos will maintain quality for up to 3 months. To reheat, remove foil and microwave for 2-3 minutes, turning halfway through, or bake in a 350°F (175°C) oven for 20-25 minutes until heated through.
For the freshest results, freeze the main components (chicken, rice, beans) separately from the fresh toppings (lettuce, tomato, avocado). When ready to serve, reheat the core ingredients and add fresh components during assembly.

Nutritional Considerations and Healthier Alternatives

The beauty of homemade chicken burritos is the control you have over ingredients and portions. Here are some strategies for creating more nutritionally balanced versions:

Increase vegetable content: Add extra peppers, onions, and other vegetables to the chicken mixture, or include finely chopped spinach or kale for added nutrients.
Choose whole grains: Substitute brown rice, quinoa, or cauliflower rice for white rice to increase fiber content.
Control sodium: Prepare beans from scratch rather than using canned varieties, or rinse canned beans thoroughly to reduce sodium content.
Moderate high-calorie toppings: Use measured portions of cheese, sour cream, and guacamole rather than adding them by the spoonful.
Lean protein choices: Opt for chicken breast instead of thighs for reduced fat content, or try ground turkey as an alternative.

Conclusion: Mastering the Art of Chicken Burritos

The journey to creating perfect chicken burritos at home is rewarding both in process and result. By understanding the fundamental components, mastering basic techniques, and allowing room for personal creativity, you can craft burritos that rival or exceed those from your favorite restaurant.

The three recipes presented here – classic shredded chicken, quick grilled chicken, and slow cooker chicken – offer different approaches to suit various cooking styles and time constraints. Each provides a solid foundation that you can adapt to your preferences, dietary needs, and ingredient availability.

Remember that the best burrito is ultimately the one that satisfies your particular cravings. Don’t be afraid to experiment with flavors, textures, and ingredient combinations until you find your personal ideal. The versatility of chicken burritos makes them an excellent canvas for culinary exploration and a reliable staple for any home cook’s repertoire.

Whether you’re feeding a family, meal prepping for the week ahead, or simply treating yourself to a satisfying homemade meal, these chicken burrito recipes will deliver delicious results that keep you coming back for more. With practice, you’ll develop an intuitive understanding of proportions and flavors that allows you to create perfect burritos without even consulting a recipe – the true mark of having mastered this beloved culinary tradition.

5 Secrets to Transform Your Leftover Roast Chicken into Delicious Meals

Introduction

About to throw away that leftover roast chicken in your refrigerator? Stop right there! What you consider mere leftovers is actually a culinary treasure with endless possibilities. In a world where fighting food waste is becoming essential, mastering the art of repurposing leftovers isn’t just economical—it’s also environmentally frieWhy Recycle Leftover Roast Chicken?ndly. Discover how to transform yesterday’s roast chicken into savory meals that will impress the whole family.

Why Recycle Leftover Roast Chicken?

Roast chicken is one of the most versatile ingredients in your kitchen. Not only does it retain its delicious flavor even after being refrigerated, but it can also integrate into almost any type of dish:

  • Save money: Transform a single chicken into multiple distinct meals
  • Reduce waste: Contribute to the fight against food waste
  • Save time: Prepare quick meals with pre-cooked meat
  • Enjoy variety: Explore different world cuisines with a single base ingredient

Nutritional Benefits of Roast Chicken

Before diving into our recipes, let’s remember why roast chicken is an excellent nutritional choice:

NutrientAmount (per 100g) % of Recommended Daily Allowance
Protein30g60%
Fat3g5%
Carbohydrates0g0g
Sodium250mg10%
Vitamin B625%
Niacin50%
Phosphorus20%
Rich in lean protein and low in fat, roast chicken forms the ideal base for balanced and satisfying meals.

Preparing and Storing Leftover Chicken

To get the most from your leftovers, follow these essential tips:

1- Cool quickly: Don’t leave your chicken at room temperature for more than 2 hours
2- Store properly: Use airtight containers
3- Label: Note the initial cooking date
4- Respect timeframes: Consume within 3-4 days in the refrigerator or 3 months in the freezer
5- Reheat to at least 165°F (74°C): Ensure the internal temperature reaches at least 165°F to eliminate any bacteria

Top 10 Quick Recipes with Roast Chicken

1Roast Chicken Caesar Wrap

Ingredients:

  • 5.3 oz (150g) shredded leftover roast chicken
  • 2 whole wheat tortillas
  • 1 oz (30g) grated parmesan
  • 1 shredded romaine heart
  • 2 tablespoons Caesar dressing
  • Freshly ground black pepper

Preparation:

1- Mix the chicken with the Caesar dressing
2- Lay the romaine on the tortillas
3- Add the chicken mixture and sprinkle with parmesan
4- Roll tightly and cut in half
5- Serve immediately or wrap for a take-away lunch

2Thai Coconut Chicken Soup

Ingredients:

  • 7 oz (200g) leftover roast chicken, in pieces
  • 1 can coconut milk (14 oz/400ml)
  • 2 cups (500ml) chicken broth
  • 1 tablespoon Thai red curry paste
  • 2 lemongrass stalks, crushed
  • 0.8 inch (2cm) fresh ginger, grated
  • 1 red onion, thinly sliced
  • 2 carrots, julienned
  • 3.5 oz (100g) sliced shiitake mushrooms
  • Juice of one lime
  • Fresh chopped cilantro

Preparation:

1- Sauté the onion, ginger, and lemongrass in a pot
2- Add the curry paste and stir for 1 minute
3- Pour in the broth and coconut milk, bring to a boil
4- Add the vegetables and simmer for 5 minutes
5- Incorporate the chicken and warm gently
5- Finish with lime juice and cilantro

3- Mexican Chicken Bowl

Ingredients:

  • 5.3 oz (150g) leftover roast chicken
  • 3.5 oz (100g) cooked brown rice
  • 1/2 avocado, sliced
  • 3.5 oz (100g) drained black beans
  • 1.8 oz (50g) corn
  • 1 diced tomato
  • 1/4 red onion, thinly sliced
  • Fresh cilantro
  • 1 tablespoon sour cream
  • Juice of one lime
  • Hot sauce (optional)

Preparation:

1- Place the rice at the bottom of a bowl
2- Arrange all ingredients harmoniously by sections
3- Garnish with cilantro, sour cream, and a drizzle of lime juice
4- Add hot sauce according to your taste

4- Chicken and Mushroom Risotto

Ingredients:

  • 6.3 oz (180g) leftover roast chicken in small pieces
  • 8.8 oz (250g) arborio rice
  • 1 finely chopped onion
  • 2 minced garlic cloves
  • 7 oz (200g) sliced button mushrooms
  • 3.4 fl oz (100ml) dry white wine
  • 3 cups (750ml) hot chicken broth
  • 1.8 oz (50g) grated parmesan
  • 2 tablespoons butter
  • 1 tablespoon olive oil
  • Fresh thyme
  • Salt and pepper

Preparation:

1- Sauté the onion in oil and butter
2- Add garlic and mushrooms, cook for 3 minutes
3- Incorporate the rice and stir until translucent
4- Deglaze with white wine
5- Add the broth gradually while stirring
6- When the rice is almost cooked, incorporate the chicken
7- Finish with parmesan and fresh thyme

5- Asian Crispy Chicken Salad

Ingredients:

  • 7 oz (200g) leftover roast chicken
  • 1 cucumber, julienned
  • 1 grated carrot
  • 3.5 oz (100g) thinly sliced red cabbage
  • 1.8 oz (50g) crushed peanuts
  • 2 sliced green onions
  • Fresh mint and cilantro

For the dressing:

  • 2 tablespoons soy sauce
  • 1 tablespoon sesame oil
  • Juice of one lime
  • 1 teaspoon honey
  • 1 grated garlic clove
  • 1 small sliced red chili (optional)

Preparation:

1- Shred the chicken and briefly sauté it on high heat to make it crispy
2- Mix all vegetables in a salad bowl
3- Prepare the dressing by mixing all ingredients
4- Add the crispy chicken and drizzle with dressing
5- Garnish with peanuts and fresh herbs

6- Chicken and Broccoli Pasta Bake

Ingredients:

7 oz (200g) leftover roast chicken in pieces
10.6 oz (300g) pasta (penne or rigatoni)
1 broccoli head in small florets
1 2/3 cups (400ml) béchamel sauce
3.5 oz (100g) grated Gruyère
1 minced onion
2 chopped garlic cloves
1 teaspoon whole grain mustard
Grated nutmeg
Breadcrumbs

Preparation:

1- Preheat the oven to 350°F (180°C)
2- Cook the pasta al dente and the broccoli
3- Prepare the béchamel with garlic, mustard, and nutmeg
4- Mix the pasta, broccoli, chicken, and sauce
5- Pour into a baking dish
6- Sprinkle with cheese and breadcrumbs
7- Bake for 25 minutes until the top is golden

7- “Carnitas” Style Chicken Tacos

Ingredients:

  • 8.8 oz (250g) shredded leftover roast chicken
  • 8 small corn tortillas
  • 1 sliced onion
  • 2 chopped garlic cloves
  • 1 teaspoon ground cumin
  • 1 teaspoon smoked paprika
  • 1/2 teaspoon dried oregano
  • 1 lime
  • 2 tablespoons olive oil
  • Fresh cilantro
  • Pickled onions (optional)
  • Sliced avocado

Preparation:

1- Sauté the onion in oil
2- Add garlic and spices, cook for 1 minute
3- Incorporate the shredded chicken and brown it
4- Drizzle with lime juice
5- Warm the tortillas
6- Top them with chicken, cilantro, pickled onions, and avocado

8- Express Indian Chicken Curry

Ingredients:

  • 8.8 oz (250g) leftover roast chicken in pieces
  • 1 chopped onion
  • 2 minced garlic cloves
  • 0.8 inch (2cm) fresh grated ginger
  • 1 can crushed tomatoes
  • 6.8 fl oz (200ml) coconut milk
  • 2 teaspoons garam masala
  • 1 teaspoon turmeric
  • 1 teaspoon ground cumin
  • 1/2 teaspoon chili powder (adjust to taste)
  • Fresh cilantro
  • Basmati rice for serving

Preparation:

1- Sauté the onion, garlic, and ginger
2- Add the spices and cook for 1 minute
3- Pour in the crushed tomatoes and simmer for 5 minutes
4- Incorporate the coconut milk and chicken
5- Simmer for 10 minutes
6- Serve with basmati rice and fresh cilantro

9- Crustless Chicken and Leek Quiche

Ingredients:

  • 7 oz (200g) leftover roast chicken in pieces
  • 2 sliced leeks
  • 4 eggs
  • 6.8 fl oz (200ml) heavy cream
  • 3.5 oz (100g) grated cheese
  • 1 tablespoon olive oil
  • Nutmeg
  • Fresh thyme
  • Salt and pepper

Preparation:

1- Preheat the oven to 350°F (180°C)
2- Sauté the leeks until tender
3- Beat the eggs with the cream
4- Add the cheese, nutmeg, salt, and pepper
5- Incorporate the chicken and leeks
6- Pour into a greased pie dish
7- Bake for 25-30 minutes until the quiche is golden and firm

10- Chicken and Vegetable Fried Rice

Ingredients:

  • 7 oz (200g) leftover roast chicken, diced
  • 10.6 oz (300g) cooled cooked rice
  • 1 carrot in small dice
  • 3.5 oz (100g) peas
  • 2 beaten eggs
  • 3 sliced green onions
  • 2 chopped garlic cloves
  • 0.4 inch (1cm) grated ginger
  • 2 tablespoons soy sauce
  • 1 teaspoon sesame oil
  • 2 tablespoons vegetable oil

Preparation:

1- Heat the oil in a wok
2- Make an omelet with the beaten eggs, set aside
3- In the same wok, sauté garlic and ginger
4- Add the carrot and cook for 2 minutes
5- Incorporate the rice and stir-fry for 3 minutes
6- Add the chicken, peas, and soy sauce
7- Cut the omelet into strips and incorporate it
8- Finish with sesame oil and green onions

5 Gourmet Recipes to Impress Your Guests

  1. Chicken and Wild Mushroom Vol-au-vent
    A classic revisited with wild mushrooms and a creamy sauce flavored with white wine and fine herbs.
  2. White Chicken and Spinach Lasagna
    An elegant version of traditional lasagna, with parmesan béchamel, fresh spinach, and shredded roast chicken.
  3. Individual Chicken Wellington
    Wrap your roast chicken in a mushroom duxelle and puff pastry for a dish that will impress every time.
  4. Chicken and Mozzarella Arancini
    These fried risotto balls, stuffed with roast chicken and melting mozzarella, make a perfect sophisticated appetizer.
  5. Rustic Chicken and Root Vegetable Pie
    A comforting winter pie with a generous filling of chicken, parsnips, carrots, and turnips, flavored with thyme and rosemary.

5 Lunch Box Ideas for the Office

1- Teriyaki Chicken Bento Box – With rice, edamame, and pickled vegetables
2- Salad Jar – Layers of quinoa, chicken, crunchy vegetables, and separate dressing
3- Pita Pocket – Pita bread filled with chicken, hummus, and raw vegetables
4- Buddha Bowl – Base of whole grains, chicken, roasted vegetables, and tahini sauce
5- Pasta Salad – Whole wheat pasta, chicken, sun-dried tomatoes, olives, and pesto

5 International Recipes to Discover

1- Chicken Pad Thai – Sautéed rice noodles with chicken, tamarind sauce, and peanuts
2- Chicken Enchiladas – Tortillas filled with chicken, spicy tomato sauce, and melted cheese
3- Chicken Couscous – Express version with Mediterranean vegetables and mild spices
4- Chicken Biryani – Rice flavored with Indian spices and tender chicken
5- Crispy Chicken Bao Buns – Steamed buns filled with chicken and crunchy vegetables

Chef’s Tips to Elevate Your Leftovers

1- Rehydrate your chicken – Add a little hot broth to revive the flavor and moisture
2- Play with textures – Contrast the chicken with crunchy elements like nuts or fresh vegetables
3- Try express marinades – Even pre-cooked, chicken can absorb new flavors in 15-20 minutes
4- Use the skin – Make it crispy in the oven to add a textured element to your dishes
5- Don’t forget the carcass – Prepare a homemade broth to use as a base for your next recipes

Frequently Asked Questions

Q: How long can I keep leftover roast chicken in the refrigerator?

  • A: Leftover roast chicken keeps for up to 3-4 days in the refrigerator in an airtight container.

Q: Can I freeze leftover roast chicken?

  • A: Absolutely! Roast chicken freezes very well for 2-3 months. Thaw it in the refrigerator the day before use.

Q: How can I prevent my chicken from becoming dry when reheating it?

  • A: Reheat it gently with a little liquid (broth, sauce) and cover during cooking to create steam.

Q: Is store-bought roast chicken suitable for these recipes?

  • A: Perfectly! Store-bought roast chickens are ideal for all these recipes.

Q: How can I tell if my leftover chicken is still edible?

  • A: Trust the smell (which should not be unpleasant), appearance (no mold), and texture (which should not be slimy).

Reader Testimonials

“Since discovering these recipes, I deliberately buy a larger roast chicken to have leftovers! The Thai soup has become a staple in my family.” – Sophie, 42

“As a single father working full-time, these ideas have saved me on many evenings when I lacked inspiration. Economical and delicious!” – Thomas, 38

Conclusion

Transforming your leftover roast chicken into creative meals is not just a way to reduce food waste—it’s also an opportunity to explore new flavors and culinary techniques. With these 25 varied ideas, you’ll never look at your leftovers the same way again! Feel free to customize these recipes according to your tastes and the ingredients you have on hand. Anti-waste cooking is above all creative cooking that adapts to what you have available.
So, which recipe will you try first with your next leftover roast chicken?

Velveeta Cheese Dip: A Must-Have in 5 Steps for Your Festive Gatherings.

A Captivating Introduction

A perfect evening with friends or family. The atmosphere is festive, laughter fills the air, and at the center of the table sits a steaming bowl of creamy, velvety, irresistible Velveeta Cheese Dip. Everyone is gathered around, tortilla chips in one hand, fresh veggies in the other, unable to stop dipping! What if we told you that you, too, can recreate this magical moment at home effortlessly?

Velveeta Cheese Dip isn’t just a recipe—it’s an invitation to delight in moments of sharing, indulgence, and extraordinary flavor. With a texture as smooth as velvet (hence its name, Velveeta!) and a bold, rich flavor that coats every bite, this is the ultimate snack for cozy nights or festive gatherings like the Super Bowl.
With just one bowl, you’ll become the star of any gathering. Ready to learn how to make this irresistible dip? Buckle up, because we’re about to show you step-by-step how to create a masterpiece that will change the way you think about dips forever!

The History and Origins of Velveeta Cheese Dip

Did you know that Velveeta Cheese Dip is more than just a simple cheese sauce? This dish has deep roots in Tex-Mex culture and American cooking, quickly becoming a staple for appetizers and major celebrations. Velveeta, the cheese that makes this dip extraordinary, was invented in the 1920s by Kraft. Its mission? To revolutionize the way people enjoy melted cheese.
Velveeta’s rise to fame is thanks to its unique ability to melt evenly and smoothly, a problem often faced by other cheese sauces that end up lumpy or greasy. This outstanding quality earned Velveeta a prominent spot in American kitchens. It quickly became a key ingredient in simple yet immensely flavorful dishes, including the famous Tex-Mex “queso”, a dip usually mixed with spiced tomatoes (such as Rotel) and a variety of seasonings.

Today, Velveeta Cheese Dip has become a symbol of togetherness. Whether it’s for a casual game night, a family get-together, or festive holidays, this dish draws everyone to the table. It’s also a must-have at big events like Super Bowl Sunday or summer barbecues.

Nutritional Value

While this dish is all about indulgence, it’s helpful to know what’s in your Velveeta Cheese Dip. Here’s a clear breakdown of the average nutrition per typical 50 g serving:

Nutrient Value (per 50 g serving)
Calories 120 kcal
Protein 4 g
Fat 7 g
Carbohydrates 8 g
Sodium 300 mg
Calcium 15% of daily recommended

Looking to make it healthier? Here are some easy swaps:

  • Replace Velveeta cheese with a low-fat or lactose-free version.
  • Substitute whole milk with skimmed milk or plant-based alternatives (like unsweetened almond milk or cashew milk).
    Extra Nutrition Boost: Add roasted red peppers or spinach for a dose of fiber and vitamins, all while enhancing the flavor.

Equipment Needed

One of the great things about this recipe is that it doesn’t require fancy equipment. Here’s what you’ll need:

A medium saucepan or a heavy-bottomed skillet: Ensures heat is distributed evenly for smooth melting.
A silicone or wooden spatula: Essential for stirring and preventing cheese from sticking.
A ceramic or glass serving bowl: Keeps the dip warm longer and looks elegant on the table.
Microwave (optional): For a quick and easy method.
Immersion blender (optional): Perfect for achieving a super smooth dip if adding extra ingredients like roasted vegetables

Ingredients with Substitutions

Here are the classic ingredients you’ll need for an unbeatable Velveeta Cheese Dip:

Core Ingredients

  • 500 g (1 lb) of Velveeta cheese, cut into cubes (essential for that perfect texture).
  • 1 can of Rotel diced tomatoes and green chilies (spicy, tangy magic ).
  • 1/2 cup of whole milk or heavy cream (adjust to achieve your desired consistency).

Add-Ons and Variations

Meat: Add 200 g (7 oz) of ground beef, chorizo, or grilled sausage for a heartier dip.
Extra spices: A teaspoon of smoked paprika or ground cumin gives a bold Tex-Mex flavor.
For an extra kick: Freshly sliced jalapeños or a splash of hot sauce (like Tabasco).

Step-by-Step Instructions

Step 1: Prep

Slice the Velveeta cheese into cubes. This ensures it melts faster and more evenly.

Step 2: Cook

1- Heat a saucepan over medium heat and add 1 tablespoon of butter for extra richness.
2- Gradually add the Velveeta cubes, stirring constantly with a spatula to prevent sticking.
3- Once the cheese is melted and smooth, pour in the can of Rotel (with the liquid) and stir thoroughly.

Step 3: Adjust the Texture

  • If the dip feels too thick, gradually stir in the milk (or your plant-based alternative).
  • Keep mixing until you achieve a silky, pourable consistency.

Step 4: Season and Finish

  • Taste and season with salt, pepper, cumin, or a sprinkle of smoked paprika.
  • Want a spicy twist? Toss in diced jalapeños or a dash of your favorite hot sauce.

Step 5: Serve

Transfer the dip to a heated serving bowl. Serve alongside tortilla chips, fresh veggies, or even warm pita bread slices.

Expert Tips and Tricks

1- Keep it warm: If serving at a party, place the dip bowl over a warming plate or electric dish warmer to maintain its creamy texture.
2- Double the recipe: Trust us, guests will come back for seconds and thirds—you don’t want to run out!
3- Add a surprise twist: Toss in cubed avocado or roasted corn kernels just before serving for extra flavor and texture.
4- Blend for variety: Incorporate other cheeses, like smoked cheddar or Monterey Jack, for a unique flavor profile.

Pairings and Serving Suggestions

How do you complement this crowd-pleasing dip? Here are some ideas:
  • Crunchy Tortillas: Nothing beats crispy nacho chips paired with this gooey cheese dip.
  • Veggie Platter: Offer lighter options with carrots, celery sticks, and sweet red peppers.
  • Drinks: Pair with a cold, refreshing beer, a tangy margarita, or a fizzy soda to balance the richness. and Serving Suggestions

Storage and Freezing Tips

  • Refrigerator: Store leftovers in an airtight container for up to 4 days. Reheat gently in the microwave or on the stovetop.
  • Freezer: Divide the dip into smaller portions and freeze for up to 3 months. Thaw overnight before reheating.
    Reheating Tip: Warm slowly over a low flame or in a double boiler to maintain the smooth, creamy consistency.

Testimonials and Reviews

  • Emily. R : “This dip is always the MVP of my game-day parties! My friends can’t stop talking about it.”
  • Jake. P : “I added ground chorizo, and WOW—it took the flavor to a whole new level!”
  • Sofia. L : “Velveeta Cheese Dip is my go-to recipe for potlucks. It’s easy, quick, and always gets compliments.”

Ready to Wow Your Guests?

Now that you know the 7 reasons why Velveeta Cheese Dip is a must-have for any occasion, it’s time to roll up your sleeves and make it yourself! Gather your ingredients, follow these easy steps, and prepare to create unforgettable moments with friends and family.

Made it? Let us know in the comments below how you personalized your dip or share your photos to inspire others.

15 Best Nutritious Ingredients to Add to Your Homemade Pastina Soup

Captivating Introduction

Pastina soup is a delightful dish that brings warmth and comfort to the table. Often associated with childhood memories, this simple yet flavorful soup features tiny pasta shapes, typically stars or grains, swimming in a savory broth. Whether you’re feeling under the weather or simply craving a cozy meal, pastina soup is the perfect solution. In this article, we will explore the history of pastina soup, its nutritional benefits, detailed preparation steps, expert tips, and much more.

History and Origin of the Recipe

The term “pastina” translates to “little pasta” in Italian, and it has been a staple in Italian cuisine for generations. Traditionally, pastina was served to children and those recovering from illness due to its light texture and easy digestibility. The dish has roots in peasant cooking, where simplicity and resourcefulness were key.

As Italian immigrants made their way to the United States in the late 19th and early 20th centuries, they brought their culinary traditions with them. Pastina soup quickly gained popularity among families seeking comfort food that was both nourishing and easy to prepare. Over time, variations of the recipe emerged, incorporating different ingredients and flavors while maintaining the essence of this beloved dish.

Nutritional Values

Pastina soup is not only delicious but also packed with nutrients. Here’s a breakdown of the nutritional values for one serving (approximately 250 ml):

NutrientAmount per Serving
Calories150
Protein5 g
Carbohydrates30 g
Fat3 g
Fiber1 g

This soup provides a good source of carbohydrates from the pastina, making it an excellent energy booster. Additionally, it can be enriched with vegetables and proteins to enhance its nutritional profile.

Necessary Equipment

To prepare pastina soup, you will need some basic kitchen equipment:

– A large pot

– A wooden spoon

– A knife

– A cutting board

– Measuring cups a nd spoons

– A bowl for serving

Having these tools on hand will make the cooking process smoother and more enjoyable.

List of Ingredients with Alternatives

Here’s a list of ingredients needed for pastina soup, along with some alternatives for flexibility:
Pastina: You can use any small pasta shape such as orzo, vermicelli, or even rice if you cannot find pastina.
Broth: Chicken broth is traditional, but vegetable broth works well for a vegetarian version.
Vegetables: Common choices include diced carrots, celery, and onions. Feel free to add spinach or peas for extra nutrition.
Herbs: Fresh parsley or basil adds flavor; dried herbs can be used if fresh is unavailable.
Cheese: Grated Parmesan cheese is optional but highly recommended for added richness.

Detailed Preparation Steps

  1. Prepare the Ingredients: Start by washing and chopping your vegetables into small, uniform pieces. This ensures even cooking.
  2. Heat the Broth: In a large pot, pour in your broth and bring it to a gentle simmer over medium heat.
  3. Add Vegetables**: Once the broth is simmering, add your diced vegetables (carrots, celery, onions). Allow them to cook for about 10 minutes until they are tender.
  4. Incorporate Pastina: Add the pastina to the pot. Cook according to package instructions (usually around 5 minutes). Stir occasionally to prevent sticking.
  5. Add Herbs and Cheese: Once the pastina is cooked al dente, stir in fresh herbs and grated Parmesan cheese if desired. Let it cook for another minute to meld flavors.
  6. Serve: Ladle the soup into bowls and garnish with extra herbs or cheese as desired. Serve hot with crusty bread on the side.

Expert Tips and Tricks

  • Sauté Vegetables First: For added depth of flavor, consider sautéing your vegetables in olive oil before adding the broth. This step enhances their sweetness.
  • Customize Your Soup: Feel free to experiment with different vegetables or proteins like shredded chicken or beans to make it heartier.
  • Adjust Consistency: If you prefer a thicker soup, reduce the amount of broth slightly or add more pastina. For a thinner consistency, add more broth as needed.
  • Make It Creamy: For a creamier version of pastina soup, stir in a splash of heavy cream or milk just before serving.

FAQ and Common Problem Resolution


Q: Why is my soup too salty?
A: If your soup turns out too salty, it may be due to using a salty broth. To fix this, try adding more water or low-sodium broth to dilute the saltiness.


Q: Can I freeze leftovers?
A: Yes! Pastina soup can be frozen for up to three months. Let it cool completely before transferring it to an airtight container for freezing.


Q: How do I store leftovers?
A: Store any leftover soup in an airtight container in the refrigerator for up to three days. Reheat on the stovetop or in the microwave before serving.

Variations of the Recipe

Pastina soup is versatile and can be adapted in many ways:

  • Tomato-Based Version: Add crushed tomatoes or tomato paste for a richer flavor profile.
  • Creamy Spinach Pastina Soup: Stir in fresh spinach and cream for a luscious twist.
  • Spicy Kick: Add red pepper flakes or diced jalapeños for some heat.
  • Herb Variations: Experiment with different herbs like thyme or dill for unique flavor combinations.

Pairings and Serving Suggestions

Pastina soup pairs wonderfully with several accompaniments:

  • Crusty Bread: Serve with slices of rustic bread or garlic bread for dipping.
  • Salad: A light green salad with vinaigrette complements the richness of the soup.
  • Cheese Platter: Offer a selection of cheeses on the side for added indulgence.

Storage and Freezing

Storing pastina soup properly ensures you can enjoy it later:

  • Refrigeration: Allow leftover soup to cool completely before transferring it to an airtight container. It will keep well in the fridge for up to three days.
  • Freezing Instructions: To freeze pastina soup, let it cool completely before pouring it into freezer-safe containers. Label with the date and freeze for up to three months. When ready to eat, thaw overnight in the refrigerator before reheating on the stovetop.

Cultural Significance

Pastina soup holds cultural significance beyond its nutritional value; it represents comfort across various cultures. In Italy, it’s often seen as a child’s first solid food due to its soft texture and ease of digestion. Many Italian families have their own variations passed down through generations that reflect regional ingredients and traditions.

In other cultures, similar dishes exist that embody comfort food ideals—such as Chinese congee or Japanese udon soups—demonstrating how different societies value simple yet nourishing meals during times of need or celebration.

Health Benefits

The ingredients used in pastina soup offer numerous health benefits:

  1. Garlic & Onions: Known for their immune-boosting properties.
  2. Vegetables: Packed with vitamins A & C; they support overall health.
  3. Broth: A good source of hydration; homemade versions can be lower in sodium compared to store-bought options.
  4. Pastina: Provides carbohydrates which are essential for energy production—especially beneficial during recovery from illness.

Homemade soups like pastina are generally healthier than store-bought options because you control what goes into them—allowing you to avoid preservatives while maximizing flavor!

Cooking Techniques

Different cooking methods can enhance flavors significantly:

  1. Slow Cooking: Allows flavors to meld beautifully over time; perfect if you have several hours available.
  2. Pressure Cooking: Great for quick meals while still achieving tenderness—ideal when short on time!
  3. Stovetop Cooking: Traditional method that allows constant monitoring; perfect if you enjoy hands-on cooking experiences!

Achieving perfect al dente pasta requires careful attention—add it towards end cooking time so it doesn’t become mushy!

Personal Stories

Many people have personal stories tied to pastina soup that evoke nostalgia—whether it’s memories of family gatherings around dinner tables or comforting bowls made by loved ones during tough times! Sharing these stories fosters community around food; encouraging readers alike!

Consider inviting readers at end article share their own experiences related comfort foods—they might discover common ground through shared culinary traditions!

Seasonal Variations

Adapting recipes based on seasonal ingredients keeps dishes fresh!

  1. In summer months use fresh tomatoes & zucchini instead of heavier root vegetables.
  2. During winter months consider adding kale & hearty beans alongside traditional veggies!

Weather also influences what people choose cook—warmer months might inspire lighter fare while colder months call hearty soups like pastina!

Pairing Wine


Pairing wine can elevate dining experience!
Light white wines such as Pinot Grigio complement delicate flavors found within pastinas’ broth base beautifully!
For heartier variations consider pairing red wines like Chianti which adds richness without overpowering dish itself!
Experimenting different pairings enhances overall enjoyment while exploring culinary world!

Cooking Classes/Workshops


For those looking deepen knowledge about Italian cuisine consider taking local cooking classes! Many offer hands-on experiences where participants learn traditional techniques—including making homemade pasta from scratch!
Online resources also abound providing tutorials covering everything from ingredient selection through plating techniques!

Recipe Customization


Customization allows individuals cater recipes based dietary restrictions!
1.Gluten-free options available using alternative flours/pasta shapes designed specifically cater gluten sensitivities!
2.Encourage creativity by suggesting unique ingredient swaps—using quinoa instead traditional wheat-based products adds nutritional value while maintaining texture!

Incorporating Technology


Modern technology simplifies preparing traditional dishes like pastinas’ rich heritage!
1.Instant Pots allow quick preparation without sacrificing quality!
2.Apps track nutritional values ensuring balanced meals tailored individual needs/preferences!

Final Thoughts

,
Food nourishes bodies connects us through shared experiences! Pastinas’ rich history rooted Italian tradition showcases adaptability across cultures—making it beloved dish worldwide!
By following guide create delicious bowl comforting goodness that not only satisfies hunger but evokes cherished memories along way! Gather ingredients put apron enjoy making timeless recipe today! Meta description: Discover our comforting pastina soup recipe! Easy to prepare, full of flavor, and perfect for any occasion!

Pistachio Pasta: Discover the Emerald Dream for 2025 💚

Pistachio Pasta Recipe with Creamy Pesto Sauce

Captivating Introduction

Imagine twirling vibrant green strands of pasta around your fork, each bite bursting with the nutty sweetness of pistachios and a hint of creamy decadence. Forget your usual weeknight dinners; this Pistachio Pasta is a revelation! It’s not just a meal; it’s an experience – a celebration of Italian flavors that will transport you to sun-drenched orchards with every mouthful. Ready to ditch the ordinary and embrace the extraordinary? Let’s dive into this culinary masterpiece!

History and Origin of the Recipe

While Pistachio Pasta isn’t steeped in centuries of tradition like some classic Italian dishes, it’s a modern twist on the country’s love affair with simple, fresh ingredients. Pistachios themselves have been cultivated in the Mediterranean region for millennia, prized for their unique flavor and vibrant color.

Sicily, in particular, is renowned for its exceptional pistachios, especially those from Bronte, known as “green gold.” This recipe draws inspiration from Sicilian cuisine, which often features pistachios in both sweet and savory dishes. The exact origins of Pistachio Pasta are difficult to pinpoint, but it likely emerged from innovative chefs seeking to showcase the pistachio’s versatility and create a memorable pasta experience.

Nutritional Values

Pistachio Pasta isn’t just delicious; it also offers a range of nutritional benefits. Here’s a breakdown of the approximate values per serving (adjustments may vary based on specific ingredients and quantities):

NutrientAmount per Serving
Calories450-550
Protein15-20 g
Carbohydrates40-50 g
Fat25-35 g
Fiber5-7 g

Key Nutritional Highlights:

  • Pistachios: Excellent source of healthy fats, protein, fiber, vitamins (especially B6), and minerals (like copper and manganese).
  • Pasta: Provides carbohydrates for energy. Opt for whole-wheat pasta for added fiber and nutrients.
  • Olive Oil: Rich in monounsaturated fats, known for their heart-healthy benefits.
  • Garlic: Offers antioxidant and anti-inflammatory properties.
  • Parmesan Cheese: Adds protein and calcium.

Necessary Equipment

To embark on your Pistachio Pasta adventure, you’ll need the following:

  • Food Processor or Blender: For creating the smooth and creamy pistachio sauce.
  • Large Pot: For cooking the pasta.
  • Skillet or Large Pan : For sautéing garlic and combining the sauce with the pasta.
  • Measuring Cups and Spoons: For accurate ingredient measurements
  • Colander: For draining the pasta.
  • Grater: For grating Parmesan cheese.
  • Mixing Bowls: For preparing ingredients.

List of Ingredients with Alternatives

Here’s a comprehensive list of ingredients, along with suggested alternatives to accommodate dietary needs or personal preferences:

Pasta:

  • Main: Linguine, spaghetti, or fettuccine (approx. 1 pound)
  • Alternatives: Gluten-free pasta, whole-wheat pasta, fresh pasta

Pistachios:

  • Main: Shelled, unsalted pistachios (approx. 1 cup)
  • Alternatives: Pre-shelled pistachios (if time is short), other nuts (walnuts, almonds – will alter flavor)

Olive Oil:

  • Main: Extra virgin olive oil (approx. ¼ cup)
  • Alternatives: Regular olive oil, avocado oil

Garlic:

  • Main: Fresh garlic cloves (2-3 cloves)
  • Alternatives: Garlic powder (approx. ½ teaspoon), jarred minced garlic

Parmesan Cheese:

  • Main: Freshly grated Parmesan cheese (approx. ½ cup)
  • Alternatives: Pecorino Romano cheese, nutritional yeast (for a vegan option)

Heavy Cream (Optional):

  • Main: Heavy cream (approx. ¼ cup) – adds richness
  • Alternatives: Crème fraîche, Greek yogurt (for a tangier flavor), cashew cream (for a vegan option)

Lemon Juice:

  • Main: Fresh lemon juice (approx. 1 tablespoon) – brightens the flavor
  • Alternatives: Bottled lemon juice

Fresh Basil or Parsley:

  • Main: Chopped fresh basil or parsley (for garnish)
  • Alternatives: Dried basil or parsley

Salt and Black Pepper:

  • To taste

Detailed Preparation Steps

Let’s create this Emerald Dream, step-by-step:

1- Prepare the Pistachios: If using raw pistachios, blanch them briefly in boiling water (about 1 minute) to loosen the skins. Drain and rub them in a clean towel to remove as much of the skins as possible. This will help create a smoother, more vibrant green sauce.

2- Toast the Pistachios (Optional): For a deeper flavor, toast the pistachios in a dry skillet over medium heat for 3-5 minutes, until fragrant. Be careful not to burn them.

3- Create the Pistachio Pesto: In a food processor or blender, combine the pistachios, olive oil, garlic, Parmesan cheese (reserving some for garnish), lemon juice, salt, and black pepper. Process until smooth and creamy. If the sauce is too thick, add a tablespoon or two of pasta water to thin it out.

4- Cook the Pasta: Bring a large pot of salted water to a boil. Add the pasta and cook according to package directions until al dente. Reserve about ½ cup of pasta water before draining.

5- Sauté the Garlic (Optional): For a more intense garlic flavor, heat a tablespoon of olive oil in a large skillet over medium heat. Add minced garlic and sauté for about 30 seconds, until fragrant but not browned.

6- Combine Sauce and Pasta: Add the drained pasta to the skillet (or directly to the pot if you didn’t sauté the garlic). Pour the pistachio pesto over the pasta and toss to coat. Add a splash of the reserved pasta water if needed to create a creamy consistency. If using heavy cream, stir it in at this point.

7- Serve: Serve immediately, garnished with extra Parmesan cheese, chopped fresh basil or parsley, and a drizzle of olive oil.

Expert Tips and Tricks

  • Quality Matters: Use the best quality pistachios you can find. The flavor of the pistachios will shine through in the sauce, so choose wisely.
  • Don’t Overcook the Pasta: Al dente pasta is key to a great texture.
  • Taste and Adjust: Taste the sauce before adding it to the pasta and adjust the seasoning as needed. You may want to add more salt, pepper, lemon juice, or Parmesan cheese to suit your preferences.
  • Warm Plates: Warm plates help keep the pasta warm while serving.
  • Get Creative with Add-Ins: Consider adding grilled chicken, shrimp, or vegetables like asparagus or sun-dried tomatoes to make the dish more substantial.
  • For a Vegan Version: Substitute nutritional yeast for Parmesan cheese and use cashew cream instead of heavy cream.

FAQ and Common Problem Resolution

Q: My pistachio sauce is too thick. What do I do?

  • A: Add a tablespoon or two of the reserved pasta water to thin it out.

Q: My pistachio sauce is bitter. Why?

  • A: Over-processing the pistachios can release bitter compounds. Avoid over-blending. Also, make sure you’ve removed as much of the pistachio skins as possible.

Q: Can I make this ahead of time?

  • A: The pistachio sauce can be made a day or two in advance and stored in the refrigerator. However, it’s best to cook the pasta fresh and combine it with the sauce just before serving.

Q: Can I freeze the pistachio sauce?

  • A: While you can freeze it, the texture may change slightly upon thawing. It’s best enjoyed fresh.

Q: What if I don’t have a food processor or blender?

  • A: You can finely chop the pistachios and garlic and then whisk them together with the other ingredients. The sauce will have a coarser texture, but it will still be delicious.

Variations of the Recipe

Spicy Pistachio Pasta: Add a pinch of red pepper flakes to the sauce for a kick.

Lemon-Pistachio Pasta: Increase the amount of lemon juice for a brighter, more citrusy flavor.

Mint-Pistachio Pasta: Add a handful of fresh mint leaves to the sauce for a refreshing twist.

Pistachio Pesto with Cherry Tomatoes: Roast cherry tomatoes with olive oil, salt, and pepper, and then toss them with the pistachio pasta for a burst of sweetness and acidity.

Pistachio and Arugula Pasta: Add a handful of fresh arugula to the pasta just before serving for a peppery bite.

Pairings and Serving Suggestions

Pistachio Pasta is a versatile dish that pairs well with a variety of accompaniments:

Salad: A simple green salad with a light vinaigrette or a Caprese salad with fresh mozzarella, tomatoes, and basil.

Bread: Crusty bread for soaking up the delicious sauce.

Grilled Vegetables: Grilled asparagus, zucchini, or bell peppers.

Protein: Grilled chicken, shrimp, or fish.

Wine: A crisp white wine like Pinot Grigio or Sauvignon Blanc.

Storage and Freezing

  • Storage: Leftover Pistachio Pasta can be stored in an airtight container in the refrigerator for up to 2 days.
  • Reheating: Reheat gently in a skillet over low heat, adding a splash of water or broth to prevent it from drying out.
  • Freezing: As mentioned earlier, freezing the sauce is possible but not ideal due to potential texture changes.

Testimonials and Reviews

“This Pistachio Pasta is a game-changer! The flavors are so unique and delicious, and it’s surprisingly easy to make.” – Sarah M.

“I made this for a dinner party, and everyone raved about it. It’s definitely a showstopper!” – John B.

“I’m obsessed with pistachios, and this recipe is the perfect way to showcase their flavor. I’ve made it several times, and it’s always a hit.” – Emily K.

Pistachios: A Deep Dive into Green Gold

Let’s take a moment to appreciate the star of our dish: the pistachio!

  • Botanical Background: Pistachios are the seeds of the Pistacia vera tree, native to the Middle East and Central Asia.
  • Cultivation: The trees thrive in hot, dry climates with well-drained soil. It takes several years for a pistachio tree to begin producing nuts, and they typically bear fruit every other year.
  • Harvesting: Pistachios are harvested in the late summer or early autumn when the outer hull splits open, revealing the nut inside.
  • Nutritional Powerhouse: As mentioned earlier, pistachios are packed with nutrients, making them a healthy and delicious addition to any diet.
  • Culinary Uses: Beyond pasta, pistachios are used in a wide variety of dishes, including desserts, salads, sauces, and snacks.
  • Global Production: Iran and the United States (California) are the world’s leading producers of pistachios.

Elevating Your Pistachio Pasta: Culinary Tweaks and Twists

Now that you’ve mastered the basic recipe, let’s explore some more advanced culinary techniques to take your Pistachio Pasta to the next level:

  • Homemade Pasta: Making your own pasta from scratch is a labor of love, but it’s well worth the effort. Fresh pasta has a superior texture and flavor compared to store-bought dried pasta.
  • Infused Olive Oil: Infuse your olive oil with garlic, herbs, or chili flakes for added depth of flavor.
  • Brown Butter Pistachio Sauce: Brown butter adds a nutty, caramelized flavor to the sauce. Simply melt butter in a skillet over medium heat and cook until it turns golden brown and fragrant. Be careful not to burn it.
  • Ricotta Salata: Instead of Parmesan cheese, try grating ricotta salata over the pasta. Ricotta salata is a firm, salty cheese that adds a unique flavor and texture.
  • Toasted Breadcrumbs: Toasted breadcrumbs add a crunchy element to the dish. Toss breadcrumbs with olive oil, garlic, and herbs, and then toast them in a skillet until golden brown.
  • Citrus Zest: Add a pinch of lemon, orange, or grapefruit zest to the sauce for a bright, aromatic flavor.

Pistachio Pasta: A Feast for the Senses

Pistachio Pasta is more than just a meal; it’s a sensory experience. The vibrant green color is visually appealing, the nutty aroma is enticing, and the creamy texture is incredibly satisfying.

The combination of flavors – the sweetness of the pistachios, the sharpness of the Parmesan cheese, the brightness of the lemon juice, and the earthiness of the garlic – creates a harmonious balance that will tantalize your taste buds..

Serving Pistachio Pasta with Style

Presentation is key to creating a memorable dining experience. Here are a few tips for serving your Pistachio Pasta with style:

  • Use a Beautiful Bowl: Choose a bowl that complements the vibrant green color of the pasta.
  • Garnish Generously: Don’t be shy with the Parmesan cheese, basil or parsley, and olive oil.
  • Add a Pop of Color: Consider adding a few edible flowers or a sprig of fresh herbs for an extra touch of elegance.
  • Serve with Confidence: Present your dish with pride, knowing that you’ve created a culinary masterpiece.

Why You Should Make Pistachio Pasta Tonight! (A Final Call to Action)

Are you still hesitating? Don’t be! Pistachio Pasta is:

  • Easy to Make: Even if you’re a beginner cook, you can master this recipe in under 30 minutes.
  • Impressive: It’s a dish that’s sure to impress your family and friends.
  • Versatile: It can be adapted to suit your taste preferences and dietary needs.
  • Delicious: It’s simply irresistible!

So, what are you waiting for? Gather your ingredients, put on your apron, and prepare to embark on a culinary adventure. Your taste buds will thank you!